Webmin: Your Web-Based Server Control Panel
A Comprehensive Guide to Installation in Ubuntu 24.04
What is Webmin?
Webmin is a powerful, web-based interface for Unix-like operating systems that simplifies system administration. Instead of memorizing complex command-line instructions, Webmin allows you to manage various aspects of your server—such as user accounts, disk quotas, services, configuration files, and more—through a user-friendly graphical interface in your web browser. It’s especially useful for beginners or anyone who prefers a visual approach to server management.
Prerequisites
- An Ubuntu 24.04 server instance (or a similar Debian-based distribution).
- A user account with `sudo` privileges.
- Access to the server’s terminal (via SSH or direct console).
- An active internet connection on the server to download packages.
Webmin Installation Steps (Ubuntu 24.04)
1. Update Your System
Always start by updating your system’s package list to ensure you get the latest software versions and dependencies.
sudo apt update
sudo apt upgrade -y
2. Download and Run the Webmin Setup Script
The easiest way to install Webmin is by using its official setup script. This script automatically adds the Webmin repository and GPG keys, allowing you to install and update Webmin using `apt`.
curl -o webmin-setup-repo.sh https://raw.githubusercontent.com/webmin/webmin/master/webmin-setup-repo.sh
sudo sh webmin-setup-repo.sh
When prompted, type `y` and press Enter to confirm setting up the Webmin releases repository.
3. Install Webmin
With the repository configured, you can now install the Webmin package.
sudo apt install webmin --install-recommendsThis command will install Webmin along with all necessary dependencies. The process may take a few minutes.
4. Configure Firewall (UFW)
Webmin listens on TCP port 10000. If you have the Uncomplicated Firewall (UFW) enabled on your Ubuntu server, you must allow traffic on this port.
sudo ufw allow 10000/tcp
sudo ufw reload
Verify UFW status with `sudo ufw status` to ensure the rule is active.
Accessing Webmin
Once the installation is complete and your firewall is configured, you can access the Webmin web interface from your local machine’s browser.
Open your web browser and go to:
https://YOUR_SERVER_IP_OR_DOMAIN:10000(Replace `YOUR_SERVER_IP_OR_DOMAIN` with your server’s actual IP address or domain name.)
You will likely encounter a “Your connection is not private” or “Security Risk” warning. This is normal because Webmin uses a self-signed SSL certificate by default. You can safely proceed by clicking “Advanced” or “Accept the Risk and Continue.”
At the login screen, use your server’s root username and password, or the credentials of any user with `sudo` privileges.
Webmin Dashboard Preview
After successfully logging in, you’ll be greeted by the Webmin dashboard. This is where you can start managing your server’s various components. Below is a conceptual preview of what you might see:
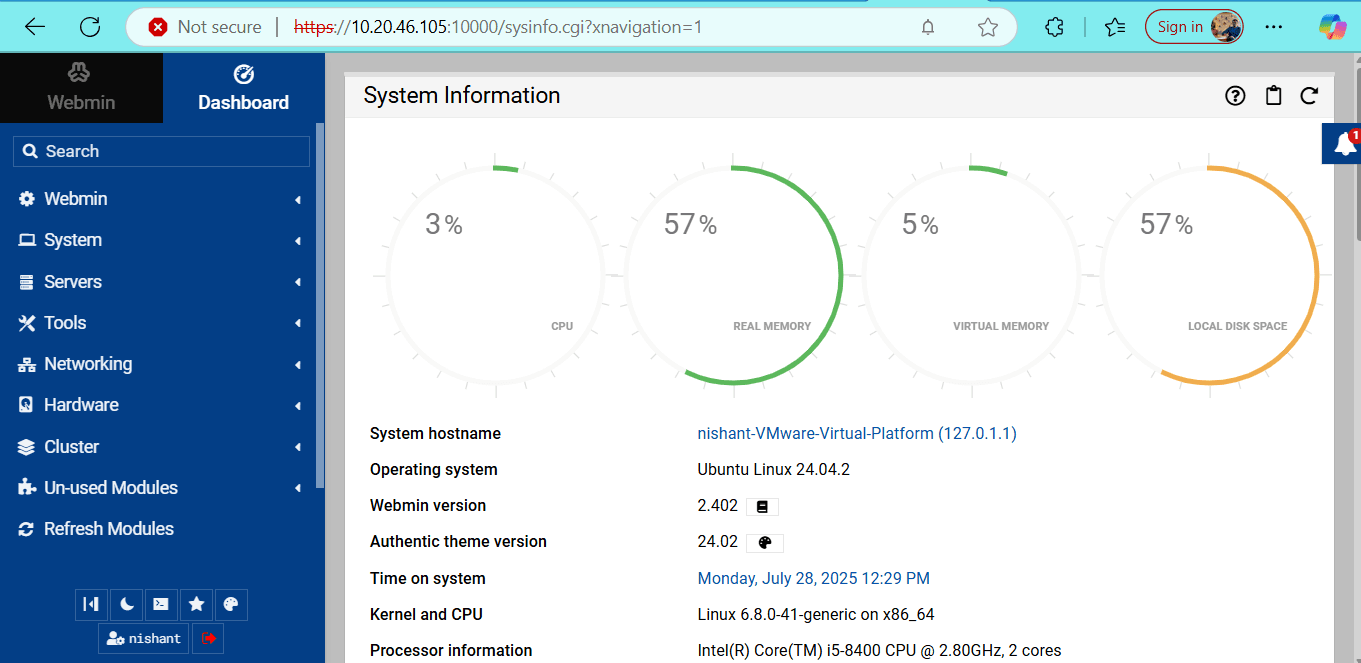
The dashboard provides an overview of your system’s status, including CPU usage, memory, disk space, and pending updates. On the left sidebar, you’ll find a comprehensive list of modules for managing different services and configurations.
Webmin offers a powerful and intuitive way to administer your Unix server without needing extensive command-line knowledge. We encourage you to explore its features and discover how it can simplify your server management tasks!